
As part of my preparation for the Susitna 100 next month, I had to build a sled to haul my 15+ pounds of required gear. Much to my frustration, I had trouble finding much good information online on building a sled for winter running. I did find some decent information on building a pulk, but those are typically geared toward hikers and/or hunters pulling a much larger load, often travelling across unpacked snow. Some of the ideas are transferable, but many are not. I also spent a fair amount of time talking to other runners I know who have done this race, and asked them about how they built their sleds. I even went as far as scouring the intertubes for photos of runners pulling sleds, zooming in and gathering as much information as I could about their sled construction.
In the end, what I came up with was a pretty basic sled design. There are some people who get way more complicated with their sleds. Although their designs may be superior in some ways, my decisions on my sled design were guided by 2 principles:
- I wanted my sled to be as simple as possible, with the least likelihood of something breaking during the race.
- If something did break, what would be the easiest to repair out on the course?
I tried to do my best to take photos along the way, detailing as much as possible what went into building my sled. Hopefully this will help save someone some research time and staring at tiny pixelated photos like I did!
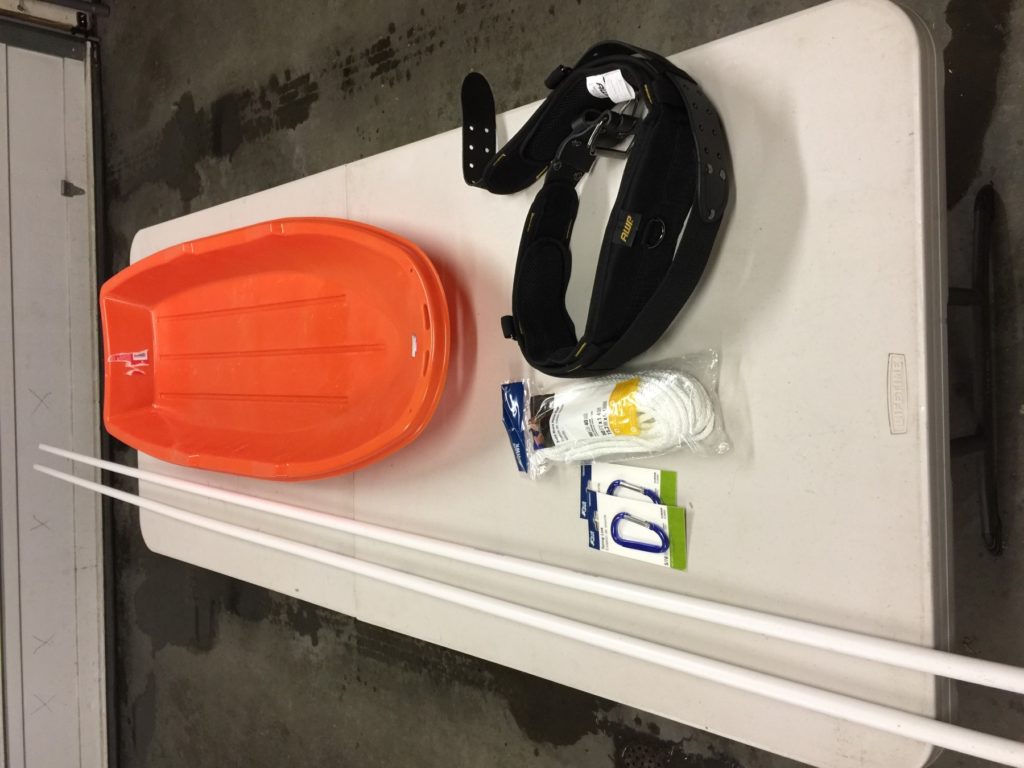
All the materials for building my sled laid out in my garage. As you can see, there’s not much to it:
- 36″ cheap plastic kids sled. These typically come in 36″ and 48″ sizes. I figured the shorter size would mean less surface area in contact with the ground, so I went that route.
- Padded tool belt. I spent a lot of time looking for backpacking belts, but since most modern backpacks are all one-piece, nobody sells just the waist belt anymore. I did manage to find a few specially-made belts, but they were quite expensive. I thought about looking for an old external frame backpack on Craigslist, just to take the waist belt from it, when I found this tool belt by accident at Lowes for $20 while shopping for the other parts for my sled.
- 1/4″ nylon rope
- 1/2″ PVC pipe. These will be used to form a rigid tow line, to keep the sled separated from me and prevent it from running into me when going down a hill. The rope will be threaded through the PVC, connecting the sled and the belt.
- Cheap carabiners for attaching the rope to the belt

First up was drilling holes around the edge of the sled to thread the rope through. I wanted to thread the rope down each side of the sled to create tie-in points for securing my load.

Next was to cut the PVC pipes down to size. The ones I bought were 10′ long, and I cut them down to 6′. What I’ve read and heard from others is that a good rule of thumb is to have them be about the same length as your height. That way you’re sure not to kick them as you run. I also remember from my high school physics class that when dragging a load, the smaller the angle that you’re pulling from, the less force is required (and longer poles = smaller angle).

Next I sanded all the edges where I cut the PVC – I certainly don’t want a rough edge to fray the rope and eventually cause it to break!

Next I threaded the rope through the PVC, and tied one end to a carabiner.

Finally, I threaded the other end of the rope through the holes in the sled, and tied off each end at the back of the sled. I also attached the carabiners to the belt. You’ll notice that I’ve crossed the poles – from talking to others, this helps quite a bit with keeping the sled tracking nicely behind you as you run. Turning around is more difficult, but I shouldn’t have much need to do that during the race.

One minor detail I added was drilling a small hole through both PVC pipes where they cross, and tying them together. This will hold them in place and prevent them from banging together – something I imagine that would get quite annoying over the course of 100 miles!
As luck would have it, I already had a big duffel bag that fit perfectly in my sled and was easy to secure in place. All that’s left now is to take it for a test drive run!

Update #1: Overall I was very happy with this setup after my first test run. However, it was quickly apparent that the carabiners allowed too much slack, and caused the sled to “bounce” back and forth too much for my liking. So I removed the carabiners, and just tied the ropes directly to loops on the belt. This helped a great deal. Also, after a few longer runs with the sled, the nylon rope had stretched out a fair amount, which was causing more bouncing. All I had to do was re-thread the ropes through the sled to tighten them back down, so it didn’t take long to remedy that problem. I imagine I’ll end up doing that at least once more before race day.
Update #2: Around New Years, I was discussing sleds with my cousin. His wife is also running the race with me, and he has been super excited about the sled construction part of this adventure. He literally fabricated her sled from scratch. When I told him about my sled design and how it had been doing on recent runs, his eyes lit up with ideas. Overall I’ve been pretty happy with how my sled has been working out, and I’m firmly in the “if it ain’t broke, don’t fix it” camp, so I didn’t want to mess with it too much. But one thing that had been in the back of my head was figuring out a way of attaching some sort of runners to the bottom to reduce surface area contact, and help it glide better across the snow. I had thought of buying an old pair of cross country skis and cutting those down for this purpose. My cousin still had some leftover runner material he used on his wife’s sled (some sort of high density plastic), and he offered to make some runners for me. Just a few hours later he texted me this photo of the finished product, and I couldn’t wait to try it out!

The material he used is very lightweight, so it barely added any weight to the sled. I’ve only taken it out once since adding the runners, but it made a very noticeable difference in how easily it pulled behind me.
Update #3: after a long run in fresh deep snow, my sled was taking on tons of snow, adding unnecessary weight and soaking my non-waterproof duffel bag. So I added a cover, which has worked out fabulously.